 For more than 67 years, Martin-Baker has been the world leader in the design and manufacture of ejection seats. The company’s latest designs offer unprecedented life-saving capabilities while providing systems and interfaces to fully integrate the pilot with cockpit and aircraft systems. Over 70,000 ejection seats have been delivered to 93 Air Forces around the world and have saved over 7,510 aircrew lives. The company is also a world leader in the design and manufacture of crashworthy seating systems and high strength fixed seats. Over 20,000 of these seats have been delivered to military and commercial customers.
The Martin-Baker Headquarters is located on a wholly Company owned 22 acre site in Higher Denham, 30 miles north-west of London and 10 miles from London Heathrow. Management of all aspects of the Company’s business is handled at this site, as well as design and development engineering, manufacturing and environmental testing.
Martin-Baker is BS EN ISO 9001 Quality Management System accredited, US MIL-Q-9858A Quality System approved and is a CAA/FAA Certified supplier for commercial seating and safety. To help ensure the highest standards of quality control, as well as manufactured components undergoing rigorous final inspection routines, production personnel also make painstaking in-process quality checks. In addition to the company’s Quality Department being equipped with a wide range of state-of-the-art equipment, regular investments are also made in advanced inspection aids for use in production departments.
Recently, the design changes of a vital ejection seat component placed increased demands on Martin- Baker’s shop-floor surface finish verification functions. In accordance with the company’s philosophy of equipping production personnel with the best available quality control equipment, a search was made for a suitable surface finish tester.
Darren Smith, Martin-Baker Inspection Manager explained. “Martin-Baker oversees a rigorous quality regime that is reflected in all of our activities. To help ensure the quality of our products, we use the best available inspection equipment, not only in our Quality Department, but also in our production departments for in-process checks.”
“Recent design modifications to a high volume component’s surface finish parameters prompted us to investigate the availability of cutting-edge surface finish testers for use on our shop-floor. Rather than simply address our current surface finish inspection needs, we decided to seek an accurate, long term solution that would also meet all of our foreseeable shop-floor surface finish inspection needs.”
“Armed with our demanding specification for a highly precise, easy to use programmable system that could supply accurate readings in multiple surface finish parameters, we looked at three leading manufacturers’ surface finish testers. When judged against all of our criteria we decided Mitutoyo’s SV-3100, with the addition of a Y axis table, best matched our requirements.”
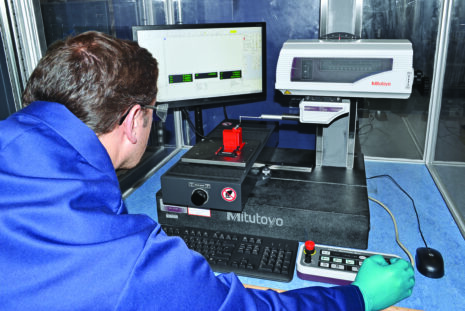
“The SV-3100 has now been installed in a protected surface finish inspection station within the relevant cell. Now, following operator training, thanks to its intuitive controls our production personnel have quickly become proficient in the unit’s operation.”
“We have now written a range of programs for the components that require surface finish inspection. To further improve the efficiency and ease of use of our advanced new Mitutoyo surface tester, we have recently designed a range of component holding fixtures and produced them on our 3D printer. These useful fixtures securely hold the parts under test and present them to the surface tester in the correct orientation. Within machining cycle times, our production personnel are now able to load a part onto the appropriate fixture, recall the relevant program and instigate a fully automated surface testing routine.”
“The use of our new SV-3100 and Mitutoyo’s Formtracepak software now provides our operators with easy access to surface roughness analysis, contour analysis and contour tolerancing. To ensure traceability, on completion of a component surface finish test a detailed inspection report is generated and archived.”
Mitutoyo offers a wide range of high-quality surface roughness testers from small, battery powered portable
units, through to the most sophisticated laboratory type CNC instrument that makes measurements to state-of-the- art accuracy and resolution standards.
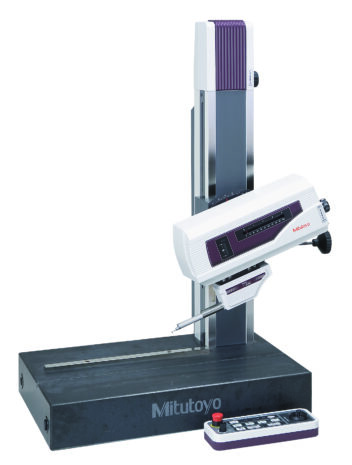
The Mitutoyo Surftest SV-3100, as purchased by Martin- Baker, is a multifunctional surface roughness tester that provides extremely accurate, high-level 3D analysis of fine contour, as well as conventional surface roughness measurement. The tester’s X-axis uses a ceramic drive unit guideway for superior wear resistance, and makes use of high accuracy glass scales to ensure reliable positioning and measurement. Advanced features include a straightness compensation function which improves the linear accuracy of the X-axis, particularly important in horizontal roughness parameters that require high-accuracy X-axis travel.
 The SV-3100 boasts a circular compensation function operating on the vertical movement of the stylus, as well as a stylus-tip radius compensation function. The instrument’s stylus and the skid are easily replaced and optional styli and skids are available allowing a wide variety of roughness measurement applications to be performed.
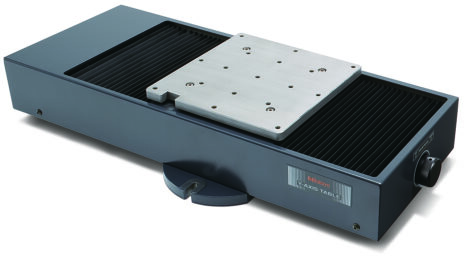
For operator convenience the SV-3100 is supplied with an easy-to-operate remote control box that is independent from the main unit, allowing positioning, measurement start/stop, stylus retraction, and other operations to be performed remotely. The drive unit’s up/down positioning and X-axis traverse can also be fine controlled manually. Mitutoyo’s motor-driven Y-axis table, as specified by Martin-Baker, is suitable for the convenient mounting of workpieces or fixtures. The robust table mounts directly on the base of the machine and enables efficient, automatic measurement of multiple, aligned workpieces or multiple points on a single measurement surface.
