When CDK Seals won an order for the production of metal components from a new aerospace customer, the leading manufacturer of seals for the food, pharmaceutical and petrochemical sectors had to employ new production equipment and methods. Historically, the Yeovil manufacturer has produced its seals on specialist machines from a variety of PTFE composites, however the new £100,000+ order required a 3 part assembly with steel, ally-br onze and PTFE.
With a Doosan Lynx 220 Y-axis turning centre delivered in time for the contract to commence in April 2016, the manufacturer of piston, rod, rotary and static seals needed additional support with respect to producing and measuring the new assembly. It is here where Mitutoyo stepped into the equation.
Commenting upon winning the order and the arrival of the Doosan turning centre, Managing Director Mr Dave Paget says: “Coincidentally we ordered the Doosan before we won the order, so when the machine was delivered we needed to work out how to machine the parts and also measure the components that complete the aerospace assembly. When it came to measuring the parts, we called Mitutoyo and their engineer interrogated the part drawings and delivered a solution. It was an extremely straightforward process that was tailored to our exact demands.” With 90% of the company’s seals manufactured on specialist Sealjet machinery, the machining of metal components brought a change of processes for the ISO: 9001 certified manufacturer.
New to machining metallic components for customers, CDK employed Arno Cutting Tools to provide a complete tooling solution for the project whilst Trevor Stubbs from Mitutoyo conducted a complete investigation from a metrology perspective.
The three component assembly consists of both a concave and convex component as well as a housing that makes the complete assembly 80 mm diameter with a 60 mm height. Recalling the process of specifying Mitutoyo, Mr Paget says: “We initially looked at local metrology companies but Mitutoyo proved the most professional, comprehensive and even cost-effective solution. We already had a range of micrometers and vernier calipers from Mitutoyo and the name is synonymous with precision and quality. This was proven by the enquiry through to installation service from Trevor Stubbs.”
The issue for CDK was that the 1500 assemblies with a total of 4500 parts had to be machined to a 0.03 mm tolerance. Unfortunately for CDK, its micrometers and vernier calipers couldn’t measure many of the complex features, especially the curved surfaces. This situation was particularly pertinent for a 4 mm diameter cross drilled hole that is positioned on one of the concave surfaces.
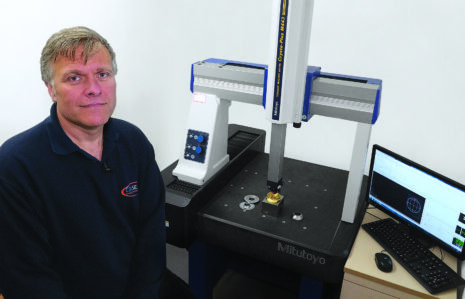
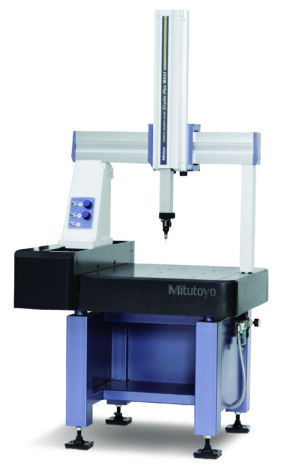
Mitutoyo invited CDK engineers to its UK headquarters in Andover to investigate the suitable options and it was agreed that the CRYSTA-Plus M433 Coordinate Measuring Machine (CMM) was the ideal solution.
The cost effective and user friendly CMM with a bridge type design has a work area of 400 x 400 x 300 mm with an astounding resolution of 0.5 μm. Utilising high precision linear scales and air bearings on all axes, the CRYSTA-Plus M433 generates unparalleled precision for workshops working in average ambient temperatures from 15ºC to 30ºC.
Commenting upon the CRYSTA-Plus M433, Mr Paget says: “We agreed with Mitutoyo that the CRYSTA-Plus was the most suitable product for measuring the highly critical parts and ordered the machine on a Thursday. It was delivered and commissioned the following Wednesday. Mitutoyo were excellent. They installed the machine and did the programming for the three seal components, so we could be instantly up and running. The training was simple and straightforward and we have the CMM networked to a PC, so we can store any subsequent programs off-line. Mitutoyo also provided a series of 3, 2 and 1 mm diameter ruby probes. The small probes enable us to get inside the 4mm diameter drilled hole and check the concentricity as well as the angle of the hole that has a critical angle tolerance of +/-0.1º.”
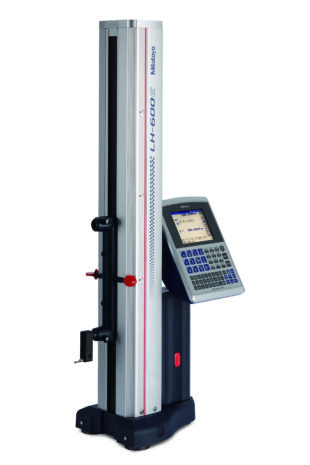
Whilst the CMM proved ideal for measuring the curved surfaces, internal holes and other critical features, it was agreed that a plate with a 60 mm internal bore with a bellow moulded to it, should be measured with a digital height gauge.
Again Mitutoyo had the solution with its high performance 2D Linear LH600E Digital Height Gauge. Capable of measuring components up to 600 mm high with an achieved accuracy of (1.1+0.6L/600) μm, the easy to use LH600E incorporates a colour TFT LCD monitor, 2GB of USB storage and air bearings in the base unit to eliminate friction over the surface plate. The critical bore assembly has a tolerance of 60 mm +0.03 mm. Now, the LH600E provides complete process reliability with its ability to support quality control and statistical processing functions.
The final issue for CDK regarding the project was the surface finish on the ally-bronze parts. The friction between the mating parts would wear the surface of the parts and this had the potential to impact the performance of the assembly. To eliminate this issue, the mating parts required a surface finish better than 0.4 Ra.
From a production perspective, CDK invested in a vibratory bowl finishing machine from PDJ Vibro to enhance the surface finish of the parts. However, the parts still required measuring to ensure conformity to the
required specifications. Once again, Mitutoyo stepped up with its Surftest SJ-210 portable surface roughness testing machine. Capable of working independently of a mains power supply, the SJ-210 is capable of measuring almost any part of a workpiece regardless of size. With a 2.4inch LCD screen, the SJ-210 is easy to use and read.
Concluding on the support from Mitutoyo, Mr Paget says: “The service and support from Mitutoyo has been outstanding. We took our project and drawings to the metrology experts and they delivered a complete and cost effective solution and they managed the project from start to finish. Mitutoyo has managed the complete project to make the process as easy and customer friendly as possible.”
