 Legex CMM Provides Productivity Solution for Navy Gage Lab
The Interface Assessment Division, a unit of the Naval Surface Warfare Center (NSWC) located in Corona, California, uses its precision measurement capabilities (traceable to national standards) to assure the form, fit and functional requirements of physical interchangeability and mechanical interoperability as specified by the Navy.
Michael Wheeler, Manager of the Interface Assessment Division’s Gage and Standards Laboratory, explains, “Our efforts support the warfighter by providing structured, proven interface control practices and precision measurements for maximum efficiency, flexibility and safety of battlefield weapons systems. The idea is to solve mechanical interface problems before they happen, that is, to ensure that interchangeability occurs as intended so weapon components work together seamlessly, without selective assembly or modifications.”
The Interface Assessment Division assures the interchangeability of weapon systems and sub-systems, solving problems before they happen in combat.
Metrology standards assure interchangeability
To assure the standardization of measurements necessary for interchangeability, the Navy’s Product Engineering Assessment Department operates the Measurement Science & Technology (MS&T) Laboratory comprised of the Standards Laboratory and the Gage Laboratory operating out of a 39,000 sq. ft. facility featuring state-of-the art environmental controls and precision measurement instruments directly traceable to the National Institute of Standards and Technology (NIST).
The two laboratories employ some of the most accurate optical, dimensional, force and gage measurements in the Navy and play critical roles in maintaining interchangeability through gage certifications and standards calibrations.
Systems complexity: driving growth of the Special Interface Gage Program
The Gage Certification Laboratory is responsible for the Special Interface Gage Program which supports and provides certification of interface gages/tooling, master tooling and other associated tooling requiring dimensional certification.
Certified gages are shipped daily to front line field units and deployed ships, including the supply of more than 750 Marine Corps units across the globe with certified/calibrated gages,(as many as 12,000 light weapons gages are shipped per year), as well as several hundred ships and defense contractors. And, driven by the procurement of ever more complex systems, the volume and diversity of certification measurement work is on the rise.
“The need to increase Gage Lab throughput caused us to seek ways to increase efficiency while maintaining accuracy. Simply put, we needed to increase productivity,” Wheeler explained. “Examining our options led to realization that an effective way to advance the lab’s metrology operations was to replace our old CMM (Coordinate Measuring Machine) with its twenty-year-old technology including hard-to-maintain through-hole circuit boards and vintage software, with a state-of-the-art CMM.”
Seeking a flexible yet ultra-precise CMM
To determine the best CMM for their requirements, the Gage Lab conducted a market survey of potential vendors. They reviewed candidates on-site and in vendor show rooms. Then they entertained presentations from five different CMM manufacturers.
According to Wheeler, “As a result of our selection process which included extensive testing, we believe the Mitutoyo Legex CMM was the best value, offering optimum flexibility to measure the wide range of gage types and sizes while maintaining the ultra-precision critical to our requirements. As a matter of fact, the Legex’s ISO accuracy specification (ISO-10360-2, 0.6+1.5L/1000µm) was a deciding factor. Once we made our choice, we handed off the results to our procuring agency (FISC: Federal Industrial Supply Command) where they confirmed our purchasing recommendation with an independent review. Initially, we learned of Mitutoyo CMMs from a colleague, and the Legex line was introduced to us by a local sales representative. In total, the procurement process required a nine month effort from research through procurement and delivery.”
After installation, the Gage Lab measured the uncertainty of the Legex CMM’s probing performance which was found to be even better than the published specification (0.6+1.5L/ 1000µm), making it the most accurate CMM in the world.
Advanced CMM operations
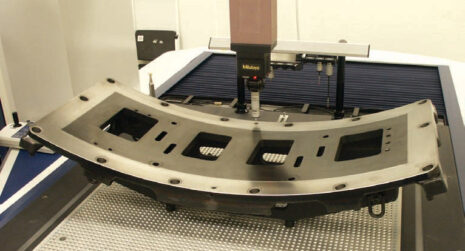
The Legex CMM is used with a Renishaw indexable touch trigger probing system as well as a Renishaw SP25M scanning probe. Ken Harrell, Gage Lab Technician, said, “…the system is efficient because we need to compare gage features located in terms of the design datum structure vs. actual geometry. In a single set-up we get a three dimensional picture of a gage – a picture that is very difficult to achieve with multiple, open set-ups. The advantage of the CMM is that it reduces uncertainty, especially for more complex geometries. Citing an example, Harrell described a Trident submarine missile door gage recently certified: “The door gage is used to measure the access hatch door to the missile loading tube used both to transport Trident missiles and to load them into a sub. The article has a radius of 45” but our gage provides only 20° of arc available for measurement, and we have to maintain the profile to less than 0.002”. The gage is about 38” across and has fourteen hole-features that are at precise angular relationships to the radius, and with positions that must be located in relation to the radius with a tolerance of less than 0.002.” (See photo)
Productivity – making every gage right
Wheeler agreed that the new CMM has significantly boosted productivity saying,
“Accounting for all measurement activity undertaken on the Legex so far, we are calculating savings of more than 40% compared to open set-up methods.”
The team at the Gage and Standards Laboratory of the Navy’s Interface Assessment Division is small, just seventeen people, but it leverages every technology to achieve the highest levels of performance. It has to. “People’s lives depend on the work we do here,” Harrell says, “Consequently we take it very seriously. When the fighter in the field pulls the trigger or activates a system, we want to make sure it works, to help keep our guys on the winning side. So, everything that goes out of this building has to be right.”
