 While manufacturers have applied model-based definition to product definition for some time, they have only recently applied it as a quality assurance process.
With more man-hours being spent on programming work, differences in worker-created measurement programs, and inefficient programs being created due to proficiency issues, the industry has moved from 2-D drawings to 3-D annotated models. A number of factors—the increased emphasis on quality control, the growing diversity of parts and components being measured, the development of more complex global supply chains and reduced product lifecycles—have led to a considerable demand for automatic measurement programming in recent years.
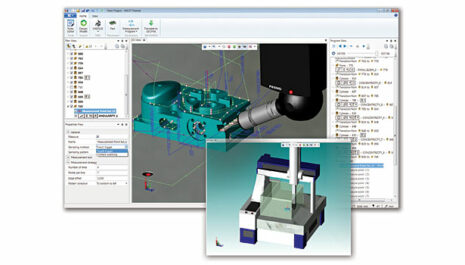
Automatic measurement program generation software uses 3-D CAD and product manufacturing information (PMI) to enable one-click automated generation of measurement programs. A complex program that previously would have taken five hours to complete manually can now be completed in 15 minutes.
Industry catalysts
Today, aerospace and defense manufacturers use coordinate measuring machines (CMMs) to gather data and compare data to computer-aided design (CAD) models. Global leaders like Boeing, Lockheed, Raytheon, Ford and Deere have joined ranks with branches of the U.S. military to encourage their partners, vendors and suppliers to use automatic measurement program generation software as part of their digital product definition strategy. It is estimated that at least 35% of the original equipment manufacturers in the Department of Defense supply chain are using model-based definitions (MBDs).
Model-based definition (MBD)
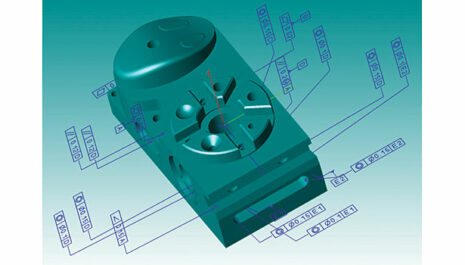
A MBD is a 3-D annotated model and its associated data elements that fully define the product definition in a manner that can be used effectively by all downstream customers in place of a traditional drawing. While manufacturers have applied MBD to product definition for some time, they have only recently applied it as a quality assurance process. MBD is a much more efficient method of getting CMM results for comparison to CAD models.
The uptick in MBD is probably the highest in the commercial aerospace and defense industries, but the medical device market is following suit.
Benefits of MBD
MBD allows for embedded geometric dimensioning and tolerancing. The 3-D CAD model incorporates all pertinent product information and high-level inspection planning data. MBD provides manufacturers with several key benefits, including:
- Streamlined processes. The 3D-to-2D-to-3D workflow, where both the MBD and the drawings are both masters, is eliminated. The new workflow is 3D CAD- to-3D CNC CMM. Programming that used to take hours to complete can now be accomplished in minutes.
- Reduced manufacturing costs. Comparing the cost of the automatic measurement program generation software against the increased productivity, the investment is worth it.
- Companies can realize a 95% savings in time compared to drawing-based methods. No physical CMM is needed to generate a program.
- Component manufacturers receive a single CAD file and complete all the necessary steps to build and inspect a part.
- All pertinent details and notes are transferred into the inspection software, reducing the risk of misinterpretation. Design changes are incorporated automatically, even on the most complex parts.
- Discrepancies between the drawing and the CAD model are eliminated. Increased efficiencies in the design-to-build and measure process.
Enhanced traceability. Because there is a direct read of the CAD model for metadata, features and characteristics, there is no misinterpretation from the drawing - Optimization. Plan parameters are easy to change. CMM configurations can be changed at any point.
- Workflow automation. Some projects today are already fully automatic, with machines talking to machines, and humans auditing to make sure the machines perform properly.
- Improved productivity. A CMM planner is much more productive due to the automation of low-level programming tasks.

How automatic measurement program generation software works
The automatic measurement program generation software bypasses the old drawing-based method to directly generate and execute a model-based workflow.
The CMM is configurable virtually. A MBD is imported, a set of rules is applied and matched to the configured CMM, and a part program is automatically generated. A second optimization is performed to reduce the number of probe changes and to minimize path length.
The configured CMM, the applied rules set, individual settings and the part itself are all saved as a single related structure. A simulated execution can be run for visual confirmation. If any additional changes—such as changing the sampling pattern from flexible grid lines or changing the number of points per line, etc.—are required, the program can make them instantly and then regenerate a report.
All CMM programmers have developed rules of thumb and best practices over time. The automatic measurement method captures these rules and practices as logical if-then statements.
They can be saved, recalled and reused. They can also be imported and exported, so they are transportable. Individual knowledge can be generalized and become something that can be applied and re-applied in a consistent manner within the enterprise and throughout the supply chain.
Purchasing considerations
When selecting metrology software to support model-based quality control, consider these key factors:
- Cost. Keep in mind, much of the cost will rapidly be offset by increased programming productivity and just-in- time program generation.
- Ability to read, organize and work with CAD models.
- Flexibility/customization. A program can be automatically generated for all features of a part or for just a selected few, and each can be saved as a complete project.
- Ability to work in a global environment and communicate measurement plans and CMM configurations to various locations around the world.
- Software support/training. While some training is required, the learning curve for automatic model-based measurement is significantly shorter than for drawing-based methods.
- Customizable reporting. All features may be required for a program for first article inspection report, or only some key features may be required for statistical process control. Programs for either situation can be automatically generated from the same MBD.
- Compatibility with a broad range of coordinate measurement systems. An alternative CMM configuration that may be larger or smaller, or may have different probes and sensors, can be easily applied without making any other changes, enabling what-if matching of potential or available CMM resources.
Conclusion
The development of software that generates parts programs for inspection is changing the relationship between people and precision measurement with one click. These sophisticated software programs reduce programming time by at least 95%, compared with programming using general-purpose software, for a significant potential increase in the efficiency of measurement processes.
Improvements in CMM equipment and developments in model-based software solutions have also helped make the technology more accessible to more companies.
