 Very small precision parts can be a challenge to measure effectively because the manufacturing tolerances are normally scaled in proportion to size, often being in the low micrometer range. The question then arises for the QA staff: how to measure such parts accurately enough to give confidence in Go/NoGo decisions and with sufficient resolution to provide a meaningful basis for SPC charting?
This is the situation that Tecan Ltd of Weymouth, Dorset had to deal with when manufacturing very thin, tightly toleranced shim discs for an OEM product. Tecan, a leading manufacturer of customised precision components, serves some of the World’s most innovative and hi-tech engineering companies in diverse industries such as Aerospace & Defence, Micro Technology, Life sciences, Communications, Electronics and Optical. A common factor is that all Tecan’s customers demand the highest quality and precision in manufacture.
A manufacturing process challenge:
Tecan is a specialist and innovator in photolithography-based manufacturing technologies. These are capable of producing a wide range of fine-featured bespoke burr- and stress-free parts that demand precision far beyond the capabilities of more conventional production methods. Photolithographic processes are either subtractive or additive in that material is either removed from thin sheets of metal by chemical action to leave only the required component, or material is deposited to grow the part, molecule by molecule, via electro-deposition, with shape and dimensions being controlled by precision masking. These extremely precise and cost-effective processes enable production of a wide range of parts in virtually any metal. The shim discs to be evaluated in this case were only around 2.2mm outside diameter with a thickness of less than 0.04mm, less than half that of a typical sheet of printer paper, so thin that they could not be made by any conventional manufacturing process to the specification required.
A measuring system challenge:
The tolerances on the inside and outside diameters of the discs could be readily checked by optical measurement but the thickness tolerance, ±2.5μm, was a challenge for any measuring system to verify reliably. The traditional solution employed for this kind of application is often a benchtop measuring machine. However, this can be expensive and take up quite a lot of room in the inspection department. An alternative is to use a standard digital micrometer but this, although more compact and much cheaper, is not attractive as it is working at the very limit of its accuracy, and the 1μm resolution is much too coarse for reliable SPC charting and analysis at this tolerance level.
An advanced micrometer:
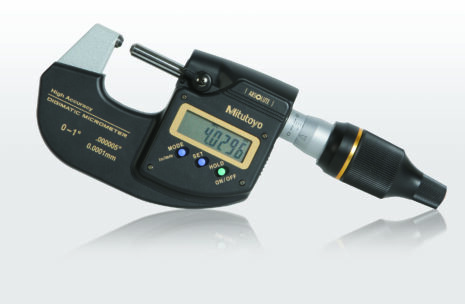
An approach to Trevor Stubbs, the Mitutoyo UK Technical Specialist who Tecan often call on for advice on measurement issues, elicited the information that a new, highly sensitive micrometer has recently been introduced to the market. This instrument boasts a wide range accuracy of ±0.5μm coupled with stunning resolution of 0.1μm, representing the highest specification for a handheld outside micrometer from any metrology equipment vendor to date. This is Mitutoyo’s Absolute Digimatic High Accuracy MDH Micrometer, model 293-130. Trevor says, “Alternative solutions for this application that provide the required performance include Mitutoyo’s Litematic Measuring Machine and the Quick Scope Vision Measuring System, both of which were considered inferior to the high-accuracy micrometer solution on grounds of cost effectiveness and/or installation space requirements.” Consequently a High Accuracy MDH Micrometer was speedily provided by Trevor for evaluation by the QA staff at Tecan’s Weymouth site.
Accuracy exceeds expectations:
R&R test results from just one day with the new micrometer exceeded everyone’s expectations. It was found that accuracy over the narrow measuring range required for evaluating the shim disc was a conservative ±0.2μm – a great improvement on that of the standard micrometer and easily good enough for this application. Based on this excellent accuracy figure, and the 0.1μm resolution, it was judged that SPC could be performed effectively on the tolerance posed by this application assuming that appropriate precautions were employed, such as using the micrometer in a stand and ensuring that the operator wore linen gloves during measurement. A typical comment from the Tecan team was, ‘’As usual, Mitutoyo products fall well within the accuracy stated.’’ The results were passed on with a recommendation to purchase several of the High Accuracy MDH Micrometers. Says Paul Stalley, Tecan UK Sales Support Manager, “This new data output-capable micrometer will speed up inspection times and give QA new confidence in the manufacturing process.”
An effective solution:
Trevor is now looking forward to introducing more of his customers to this solution, one that looks unbeatable in terms of cost and installation space requirements for tightly toleranced outside dimension applications on small components.
